

When you send dress inspiration photos to a clothing manufacturer, our pattern team uses them as a starting point, not a complete set of production instructions. We look at the silhouette, fabric, measurements, and construction details, then identify what still needs to be confirmed. Mark decisions that are already final and separate them from open questions, such as fabric choice, back closure, or finished length.
1. Choose Reference Photos That Explain the Design
You may have collected dress images from Pinterest, Instagram, competitor websites, runway collections, or physical garments. Before sending the images, note which part of the design each one is meant to show.
Sending twenty similar dress photos can create more confusion than sending three well-chosen references, especially when the neckline, waistline, or skirt shape differs between them. If the images show different necklines, sleeve shapes, and skirt lengths, the pattern maker still needs to know which details belong to your intended style.
Start with the overall appearance, then add close-ups of details that could affect pattern development or sewing.
For most dress styles, useful references include:
- Front and back views: These help establish the silhouette, neckline, waist position, skirt shape, and back construction.
- Side views: Useful when the garment has a fitted bodice, a pronounced waistline, a draped skirt, or a particular body profile.
- Detail photos: Show pleats, gathers, seams, cuffs, straps, closures, slits, and decorative finishes.
- Fabric references: Help communicate surface texture, sheen, transparency, print scale, and the way the material falls.
You do not need every view for every dress. A simple shift dress may require fewer construction references than a strapless gown with internal support and several layers.
If you like the neckline from one dress and the skirt from another, label them separately. Do not assume the factory will know which elements you intend to combine.
A short note beside each reference is often enough:
- Image A: Use as the silhouette reference.
- Image B: Refer to the neckline shape only.
- Image C: Similar fabric appearance, but use a longer skirt.
- Image D: Reference for the back closure.
Use the same style code on the reference folder and the brief if you are developing several dresses at once. This helps prevent details from one style being carried over to another by mistake.
2. Separate the Look You Want from the Construction You Need
A photo of a fitted satin dress may show a smooth bodice, but it will not tell the pattern maker how the bust is shaped or whether the design needs internal support. Those details need to be confirmed in the brief or discussed during development.
You do not need to specify every seam or internal detail if you are unsure how the dress should be constructed. Explain the fit and appearance you want, then mark which design features must not change.
For each dress, clarify the following where relevant:
- Silhouette: A-line, straight, fit-and-flare, bodycon, or another shape.
- Neckline: Square, sweetheart, cowl, halter, boat neck, or a custom shape.
- Waist and bodice: Natural waist, raised waist, dropped waist, fitted bodice, or relaxed fit.
- Sleeves and straps: Length, width, fullness, placement, and intended fit.
- Skirt: Length, volume, gathers, pleats, panels, and slit placement.
- Closure and finishing: Zipper position, buttons, ties, lining, and visible seam details.
A woven sundress may need clear notes on the neckline, waist, and hem length. A structured corset dress also needs discussion of boning, internal support, cup shape, and how the bodice should hold its fit.
Be particularly clear about the difference between a design requirement and a visual preference. If the neckline shape is essential to your collection, say that it must remain unchanged. If the factory can recommend the most suitable closure, leave that decision open.
If a sample comes back with the comment “make the bodice more flattering,” the pattern maker still needs to know what to change. Mark the bust, waist, or neckline area and explain the fit issue you can see.
3. Give Fabric Selection the Attention It Needs
Choose the fabric direction early enough for the pattern and construction to be reviewed together. A lightweight satin, for example, may fall differently from a heavier satin, even when both are intended for the same silhouette.
If you have selected the fabric, send its supplier name or code, composition, weight in GSM if available, and stretch information for knits. A physical swatch is useful when hand feel, thickness, or drape is important to the design. If the fabric has not been selected, describe the qualities you need rather than choosing a material name based only on a reference photo.
For example, a fluid satin dress and a structured satin dress may use materials with very different weights and surface finishes. Both may be described as satin, but they will not necessarily produce the same drape or require the same pattern treatment.
The same applies to other common dress fabrics:
- Chiffon: Transparency, drape, and seam finishing can affect the design and lining requirements.
- Stretch jersey: Stretch and recovery influence fit, ease, and how the garment behaves after wear.
- Lace: Motif placement, fabric width, scalloped edges, and lining coverage may affect cutting and construction.
- Tulle or mesh: Layering, transparency, stretch, and seam handling can change the finished appearance.
- Woven cotton or linen: Fabric stability, shrinkage, and the intended amount of ease need to be considered.
Discuss lining, seam finishing, and fabric handling before the sample is cut. For example, a sheer chiffon skirt may need a separate lining decision, while a stretch jersey dress needs its stretch and recovery considered during fit development.
Color also deserves a clear reference. An online image can be affected by lighting, editing, and screen settings. If you need a specific shade, provide a Pantone reference or another agreed color standard. For prints, include the original artwork where available and explain the intended scale and placement.
For example, if the original fabric is unavailable, you may accept a substitute with similar drape and weight but reject one that makes the skirt stand away from the body.

4. Make Fit and Measurements Clear Enough to Review
Do not estimate finished measurements from a model photo. Camera angle, model proportions, and clips used during a photoshoot can make a dress look tighter at the waist or shorter at the hem than it would on a finished garment.
If you have a tech pack or measurement chart, attach it to the brief. Identify the base size, finished garment measurements, intended size range, and any fit requirements that have already been approved.
For a dress, the relevant measurements may include bust, waist, hip, shoulder width, armhole depth, sleeve length, neckline depth, and finished garment length.
If you have not finalized the measurement chart, state the intended fit and provide any measurements you already trust. Leave unconfirmed points for discussion rather than entering figures that may later be mistaken for approved specifications.
For example, a bodycon dress made from stretch fabric needs to be assessed differently from a fitted woven dress. The former depends partly on stretch and recovery; the latter may need more attention to wearing ease, shaping, and closure placement.
A physical garment can also be useful as a fit reference. If you send one, specify its size and explain what you want to retain. You might like its shoulder fit but want a longer hem, a narrower waist, or a different neckline.
A reference dress can help establish the proportions you want, but its measurements should not be copied without reviewing the fabric. A stretch knit and a stable woven fabric behave differently on the body, so the pattern may need different ease and shaping to achieve a similar fit.
If your collection will cover several sizes, mention the intended size range at the beginning. Grading a fitted bodice or a shaped neckline may require more attention than simply increasing every measurement by the same amount.
5. Include the Commercial Information Behind the Design
Along with the design, send the estimated quantity per style and color, target garment cost, and required delivery date. These figures help the factory assess the proposed material, construction, and development schedule.
A first collection and a seasonal reorder can have very different constraints. A new brand may still be testing quantities and target costs, while an established retailer may already have a delivery window to meet. Share the figures you have, even if some are estimates, so the factory can flag potential issues early.
Include the following information when you have it:
Order quantity: Give the estimated quantity per style and color. If you expect different quantities across colorways, list them separately.
Size breakdown: Provide the planned quantities by size if they are available. If the breakdown is not final, identify it as an estimate.
Target cost: Clarify whether your budget refers to the garment cost or includes other expenses such as freight and duties. A target retail price can provide context, but it is not the same as a factory production budget.
Development and delivery dates: Distinguish between when you need the first sample, when you expect to approve it, and when the finished order needs to be ready.
Branding and packaging: Mention main labels, care labels, hangtags, barcodes, branded packaging, and special packing instructions.
If the target garment cost is tight, the team may need to compare fabric options or simplify certain construction details. If your launch date is fixed, fabric availability and the time needed for sample corrections should be checked early.
You do not need to have every commercial decision finalized before contacting a factory. What matters is being clear about which figures are confirmed and which are still estimates.
6. Build a Brief That Records Decisions, Not Just Ideas
Put the references, measurements, fabric details, and order information into one brief for each style. Mark each item as confirmed, provisional, or awaiting a decision so the team can see what is ready for sampling and what still needs discussion.
This becomes especially important when the designer, buyer, and product development team are different people. A detail discussed in a meeting may not appear in the original sketch, while an early suggestion may later be mistaken for an approved decision.
A simple structure works well.
Dress Production Brief Template
| Field | Information to include |
|---|---|
| Style name or code | A unique identifier for the dress |
| Reference images | Front, back, detail photos, sketches, or sample garment |
| Design priorities | Details that must remain unchanged |
| Silhouette and fit | Intended shape, fit, and finished length |
| Fabric direction | Confirmed material or preferred fabric characteristics |
| Color and print | Color standard, artwork, print scale, and placement |
| Construction details | Neckline, sleeves, closure, lining, seams, and trims |
| Measurements | Available finished measurements and base size |
| Size range | Intended sizes and grading requirements, if known |
| Quantity | Estimated units by style and color |
| Target cost | Budget or target garment cost, if available |
| Branding | Labels, hangtags, barcodes, and packaging |
| Timeline | Sample target, approval milestones, and delivery date |
| Open questions | Decisions that require factory input or buyer approval |
A spreadsheet or product development sheet is usually enough. Give each style a unique code and revision date, and use the same code for its reference images, measurement chart, and sample comments. If the neckline or fabric changes after the first review, update the brief and identify the revision instead of sending a new image without explaining what changed.
7. What the Factory Needs to Check Before Sampling
After reviewing the brief, the factory may ask for missing measurements, confirm the fabric specification, or clarify details that are not visible in the photos. A simple dress may need only a few answers, while a structured bodice or layered skirt may require a closer review before pattern development.
First, the team checks whether the proposed fabric can achieve the intended look. A soft drape may be difficult to reproduce with a stiff material, while a fitted dress may need suitable stretch and recovery or an adjustment to its construction.
The team also checks whether the construction instructions are specific enough for pattern development. The back closure, internal support, lining, and finishing method should be confirmed where they affect fit or appearance; unresolved choices should be discussed before sampling.
Are the requirements consistent with the target cost and schedule? Complex construction, special trims, material availability, and repeated sample changes can all affect development. A problem is easier to address before the sample is made than after several decisions have already been built into it.
If the factory proposes a different fabric, closure, or construction method, compare the suggestion against your original requirements. Keep essential features such as neckline shape or skirt proportions fixed if they define the style, but remain open to alternatives that meet the same fit and appearance requirements.
Once the direction is agreed, the project can proceed to pattern development and sampling. The sample then provides a physical basis for checking proportions, fit, construction, and material behavior.
When you review it, avoid comments that describe only a general feeling. If the waist looks too low, mark the seam and specify the intended change. If the skirt has too much volume, indicate the area that needs adjustment. If the fabric does not drape as expected, explain what you see and discuss whether the issue comes from the material, pattern, or construction.
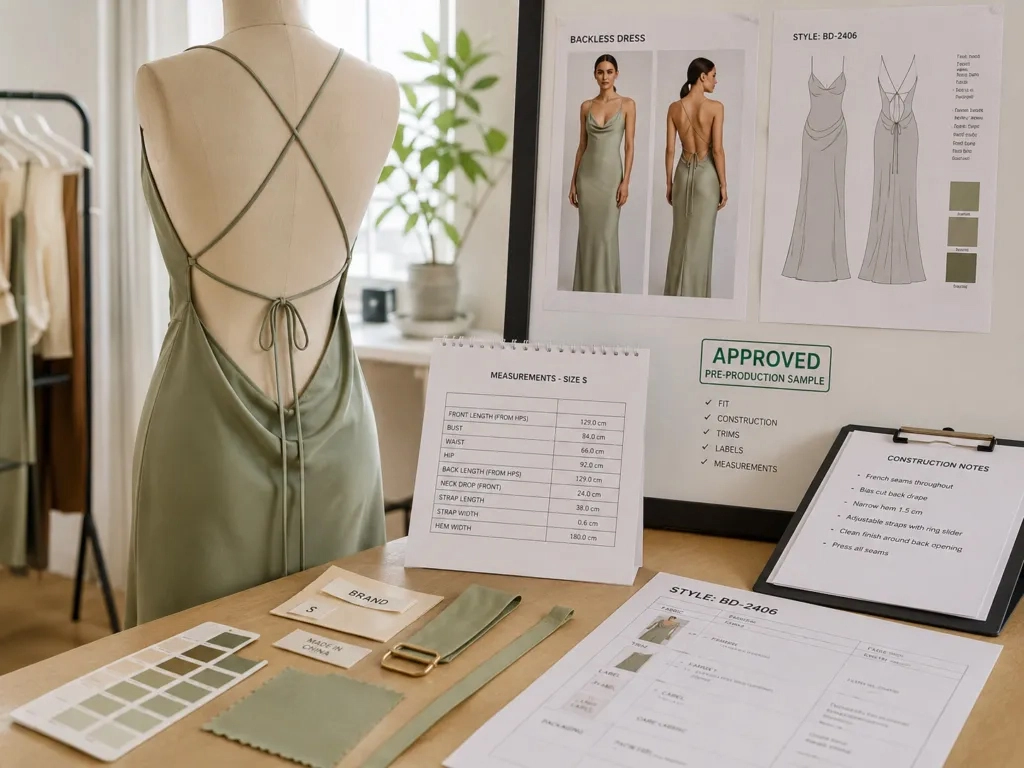
Before bulk production, make sure the approved sample matches the final measurement chart, fabric and trim specifications, color standard, and construction notes. Record any changes made during sampling so the production team is not working from an earlier version of the brief.
Frequently Asked Questions
1. Can a factory estimate the cost from inspiration photos alone?
Yes, a factory can often provide a preliminary estimate from reference photos, but the figure may change once the fabric, measurements, lining, trims, and order quantity are confirmed.
2. Do I need to send the original design files, or are screenshots enough?
Screenshots are useful for showing the design direction. For production, send the original artwork when print scale, repeat size, logo placement, or color accuracy matters. A low-resolution screenshot may not be suitable for preparing print files.
3. What should I do if my designer and buyer disagree about a design detail?
Ask one person to collect the designer’s and buyer’s comments and send the factory a single agreed set of revisions. List the conflicting points and decide which requirement takes priority. Sending separate, contradictory instructions can lead to repeated sample changes, particularly when the disagreement affects measurements, material selection, or construction.
4. Who should approve the pre-production sample?
The brand should name the person responsible for final sample approval before development starts. That person should check the sample against the agreed measurements, fabric, color, construction, and finishing requirements. Record any outstanding changes before approving the sample as the standard for bulk production.
5. What information should I keep for a repeat order?
Keep the approved sample reference, final measurement chart, fabric and trim details, color standards, construction notes, labels, and packing requirements. Record the final revision date and list any changes from the previous order, so the factory can confirm which specifications remain the same and which need updating before production.
Conclusion
Before contacting a dress manufacturer, organize the references you have, mark the details that still need approval, and share your expected quantity and delivery window. You can start the discussion without a complete tech pack, provided the factory knows which design requirements are fixed and which are open to review. Xiuyu Apparel can help you assess the information needed for dress development and discuss the next steps for sampling.